This page covers how to use the gitdata CLI (command-line interface). For installation instructions, source code, and other additional information, see the gitdata GitHub repo.
Overview
Gitdata is a tool that I built for my own use, to help automate some tasks I found myself doing over and over again.
I work at Microsoft in the Open Source Programs Office, and we sometimes need to retrieve information about Microsoft's many GitHub repos, teams, and members. For example, we may want to create a report showing growth of public or private repos in one of Microsoft's GitHub orgs. Or we may need to audit an organization's members to determine who doesn't have two-factor authentication activated.
I've written various one-off Python programs to handle these sorts of tasks, using the Requests library. After a while I decided it would be simpler to package up this functionality into a command-line tool, and gitdata is the result of that refactoring. I used Armin Ronacher's Click package, which provides a simple decorator-based approach for exposing Python functions through a CLI.
Gitdata's current functionality covers the specific types of queries that I've needed to date, including these features:
- get info about organizations, repos, teams, members, collaborators, commits
- output to the console and/or CSV/JSON files
- all data cached locally, can query live API or cache
- select fields, specify sorting order
- simple, consistent command-line syntax
Basic Concepts
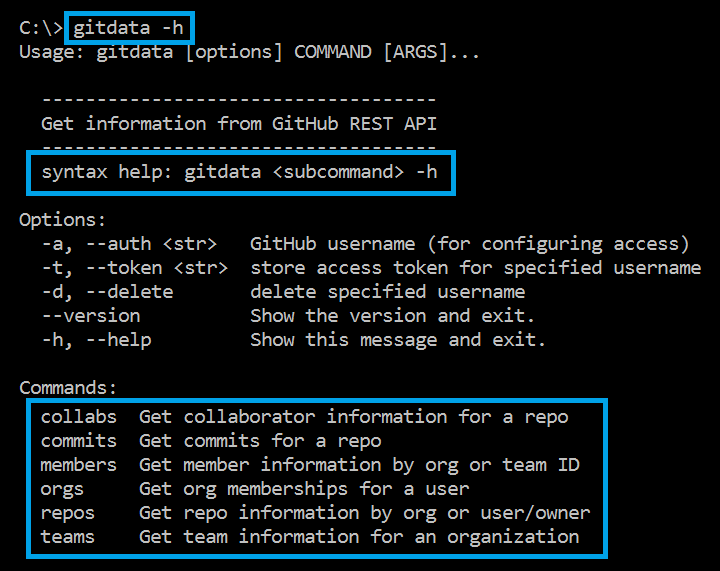
The information in this section applies to all of the gitdata subcommands. There are currently five subcommands, as shown in the help screen:
Configuring Authentication
Gitdata uses personal access tokens (PATs) for authentication in GitHub API calls. You can use gitdata without authentication for simple requests, but some information (such as organization membership) is only available to authenticated users. And the GitHub API has a much lower rate limit for unauthenticated users — 60 calls per hour, instead of the 5000 calls per hour allowed for authenticated users.
PATs are stored in a github.ini file in the _private subfolder under the parent folder of the location where gitdata is installed. To save a PAT for GitHub authentication in gitdata calls, use this command:
gitdata --auth=username --token=PAT
After you've saved a PAT in this manner, you can specify the username in gitdata calls (via the -a/--auth= option) and gitdata will look up the PAT. To view a saved username/PAT, use this command:
gitdata --auth=username
Only the first and last 2 characters of the PAT will be displayed — enough to help identify which PAT is in use, but not enough to accidentally disclose the PAT.
To delete a saved PAT, use this command:
gitdata --auth=username --delete
Quick Start
The fastest way to learn gitdata is to review the help screens and try some things. Gitdata is read-only, so you can experiment freely and the worst thing that could happen is to temporarily exhaust your GitHub API rate limit.
Note that you can get help for specific subcommands. For example, to get help on how to retrieve repo information, use the command
gitdata repos -h.
In this simple example, we're retrieving the list of organizations for which GitHub user dmahugh is a member:
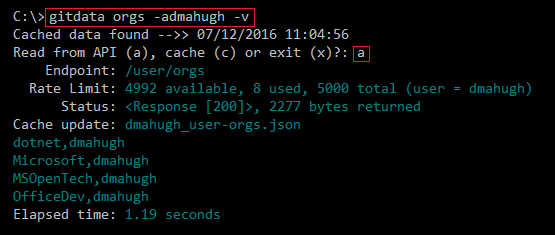
This example requires that a PAT for the dmahugh user has been configured, as covered in the Configuring Authentication section above. Here's what is being displayed in the output shown above:
gitdata orgs -admahugh -v
The orgs subcommand has been invoked, with dmahugh for the authentication username and with verbose mode on (-v). Note the use of shorthand notation, such as-vinstead of--verbose. For options that require a value to be passed, you must use an=for the long version, but not for the short version. For example,-fnameis equivalent to--fields=name.Cached data found ...
there is locally cached data available, so by default the user is prompted for which data source to use; we asked for API data (a) in this exampleEndpoint ... / Rate Limit ... / Status ...
this information is being displayed because we asked for verbose modeCache update ...
this shows that the local cached data file for this username/endpoint has been updated to include the latest data returned by the GitHub APIdotnet,dmahugh ...
these four lines show a summary of the returned data; you can turn off this console display with the -d/--display option, and/or you can customize the fields displayed with the -f/--fields optionElapsed time ...
this information is displayed because we're in verbose mode
Here's another example, showing the explicit use of the cached data source (-sc):
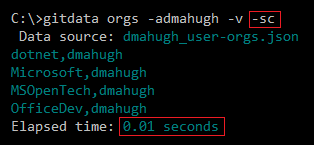
As you can see, use of the cached data provides very fast performance.
Fields and Sorting
All fields returned by the GitHub API are saved in gitdata's local cache, but only specified fields are included in console output and/or CSV and JSON output files. If you don't specify any fields, a set of default fields are returned for each entity type (collabs, commits, members, orgs, repos, teams).
To specify a custom set of fields, use the -f/--fields option and specify the field names as a /-delimited string. For example:

To determine which field names are available for an entity type, use the -l/--listfields option. For example, here are the fields that can be specified for the members subcommand:
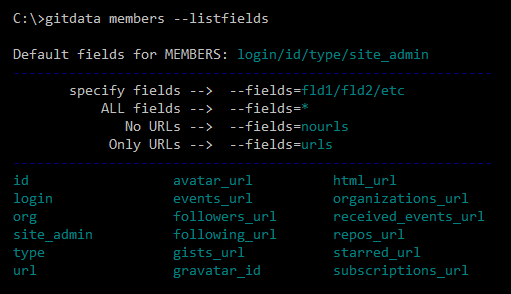
Shorthand notation can be used for all fields (*), or only the url or non-url fields. GitHub APIs return many URLs, which can be useful when building a user interface. If you're just doing data analysis and reporting, the nourls option can make data payloads up to 90% smaller.
For example, here is the full JSON payload returned for a member of an organization when using the members subcommand:
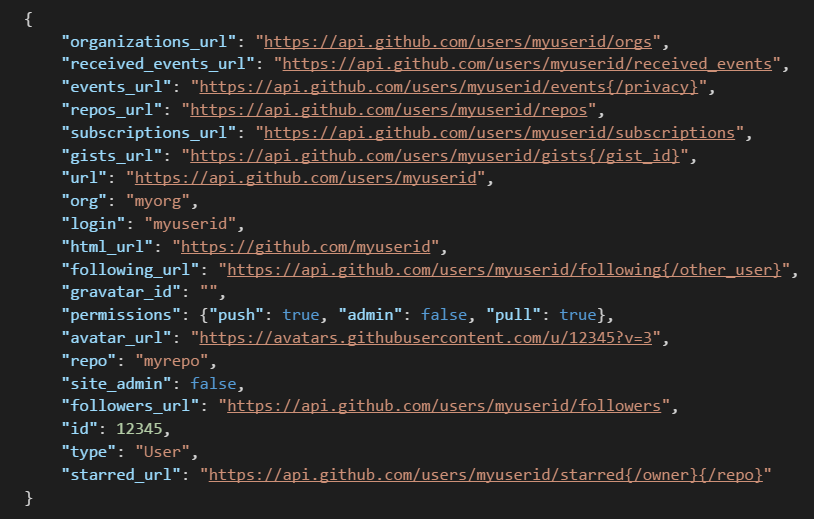
And here's the data returned when using the --fields=nourls option for the same member:

NOTE: gitdata sorts all output by the first field specified.
Saving Output
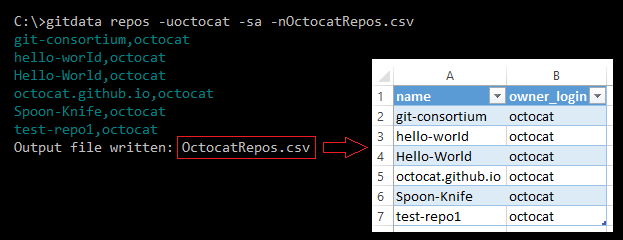
Gitdata supports saving data in CSV or JSON format. Use the -n/--filename option to specify a filename for saving output (and note that the filename must end in .csv or .json.) Here's an example of saving to a CSV file and then opening that file in Excel:
Cached Data
By default, gitdata caches all data retrieved from the GitHub API. (This behavior can be changed.)
All data is cached, not just the requested fields. For example, you can request repo names and descriptions for a large organization's repos, and then if you want to add license type to the results you can query the cached data to get the license type field.
Here's an example of retrieving the repos for user octocat, without authentication:
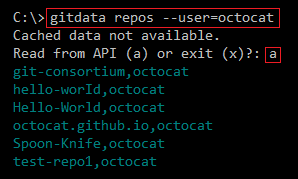
A cache file was created automatically by the above command. If you query the same data type under the same authentication username and same selection criteria, gitdata gives you the option of using the cached data:
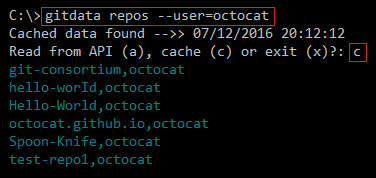
Note: if you had chosen to read from the API instead, the cache would have been automatically updated with the more recent data.
All fields are saved in gitdata's local cache, which means you can do a query from the cache that includes different fields from the ones in your original query of the API. For example:
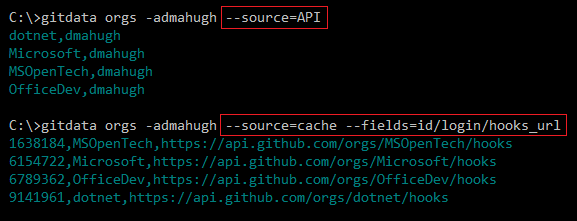
Each combination of authentication username, selection criteria, and data type is stored in a unique filename in the gh_cache folder. The filename describes the data:
- Authentication username (_anon = anonymous)
- Selection criteria (e.g., users-octocat)
- Type of information (e.g., repos)

The above information is provided here for those who want to know how gitdata's caching is implemented, but you don't need to know any of these details to use gitdata. Just type your query, and if you're presented with an option to use cached data you can either select either data source: the cache (for fastest results), or the API (for most current results).
GitHub API Pagination
Many of the GitHub API endpoints return pages of results rather than complete data sets, with links to previous/next
page provided in the response header. Gitdata hides this structure, and always returns complete data sets. If you're curious about
how this is implemented, see the github_data_from_api() and pagination() functions.
Verbose mode
The -v/--verbose flag enables verbose mode, causing a variety of information to be displayed on the console, including:
- API endpoints accessed
- HTTP status codes returned, and number of bytes returned
- API rate-limit status after each API call
- cache files read or written
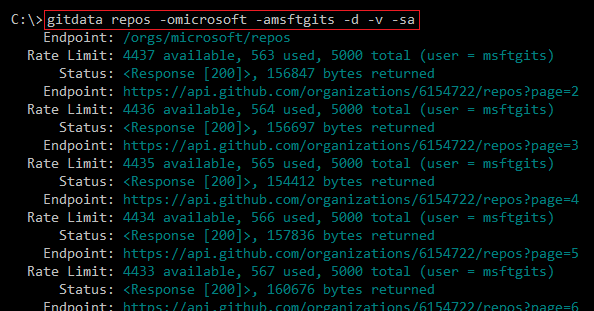
For diagnosing problems, it can be useful to suppress the default console output and only view the verbose-mode information returned. To do this, use the -d option to suppress the displayed output, in combination with the -v option to enable verbose mode.
Here's an example of retrieving all Microsoft repos with this approach; note the first endpoint is the API endpoint for repo information, then gitdata is stepping through the pagination endpoints for this set of data:
Entity Types
Gitdata supports various subcommands that correspond to specific entities (data types) that are returned by the GitHub API. Each entity may have unique options for criteria that must be provided to identify the desired information, and that information is covered below under each entity type.
The following options are common to all entities and were documented above, so these are not covered under each entity below:

Collaborators
The collabs subcommand supports two selection criteria:
-o/--ownerowner of the repo (org or user) — required-r/--reporepository name — required
These two criteria uniquely identify a repo, and the collaborators for that repo will be returned.
Commits
The commits subcommand supports two selection criteria:
-o/--ownerowner of the repo (org or user) — required-r/--reporepository name — required
These two criteria uniquely identify a repo, and the commits for that repo will be returned.
NOTE: repos with a large number of commits (tens of thousands or more) may cause out-of-memory errors, due to building the entire returned data structure in memory. We may revise the design to address this in a future update.
Members
The members subcommand supports two selection criteria: org and team ID.
-o/--orgorganization name-t/--teamidteam ID (the numeric ID, not the team name)
You must provide one of these criteria, and the members of that org or team will be returned. Note that you can get team IDs for the teams in an organization via the teams subcommand if needed.
The members subcommand also supports two command-line options that may be useful for membership governance tasks: --audit2fa and --adminonly. The --audit2fa option returns only the members that do not have two-factor authentication enabled. The --adminonly option returns all members that have role=admin.
Organizations
The orgs subcommand does not support or require any selection criteria, but (unlike the other subcommands) it requires that an authentication username (with associated PAT) be used. The returned list of organizations contains the organizations for which this GitHub user is a member.
Repositories
The repos subcommand requires that you specify the owner of the repositories. The owner can be either an organization (specified by the -o/--org option) or a user (specified by the -u/--user option).
When an organization is specified for the owner, this subcommand will return all public repos in that organization, and will also include all private repos if you are authenticating under a GitHub user who has access to those private repos.
When a user is specified for the owner, only public repos are returned. This is a limitation of the /users/:user/repos endpoint used in this case — that endpoint does not return private repos, even if you are authenticated under the same username as specified in the endpoint. This may be addressed in a future update, by using a different GitHub API endpoint in that particular case.
Teams
The teams subcommand requires that an organization be specified via the -o/--rg option. All teams in that organization will be returned.